
13.用Gpu训练

文章目录
一、Pycharm连接远程服务器
首先要确定自己的Pycharm是专业版的,平时我们用的基本上都是社区版的Pycharm,社区版的Pycharm不带远程连接的功能,所以需要用专业版的Pycharm。给大家推一篇专业版Pycharm的安装教程,只要按照这个教程进行安装即可:Pycharm专业版安装。
打开界面,点击工具箱下的deployment下的configuration。
点击加号添加服务器信息,选择SFTP,点击右边的…添加信息: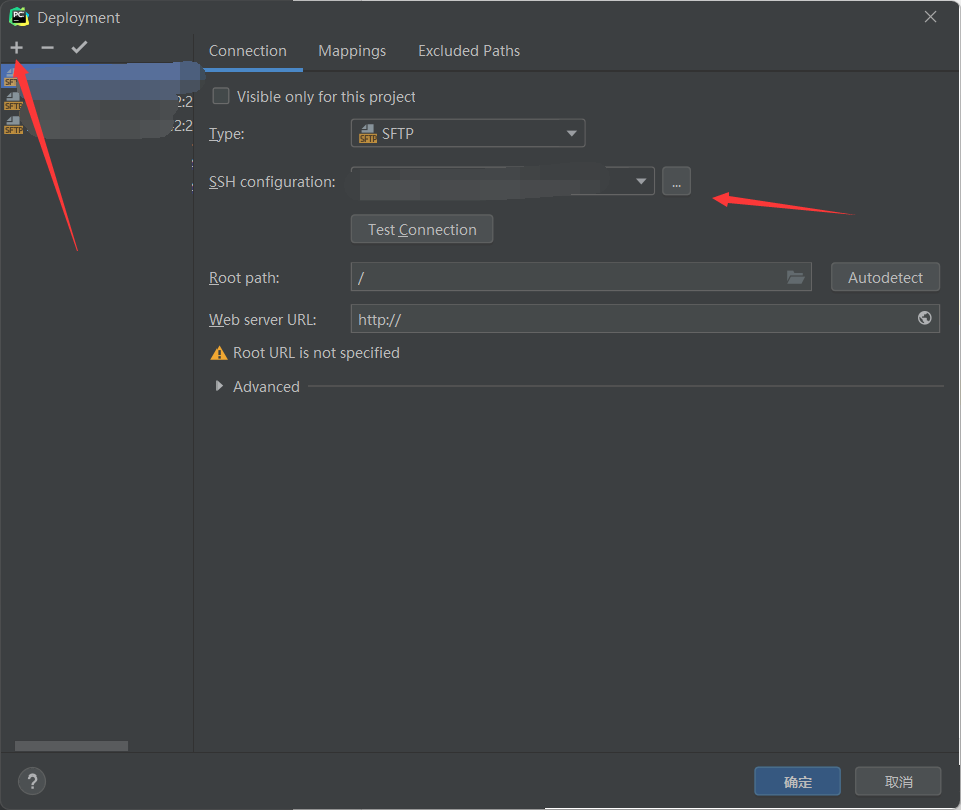
依次输入IP,端口号(默认是22),用户名(注意大小写),密码。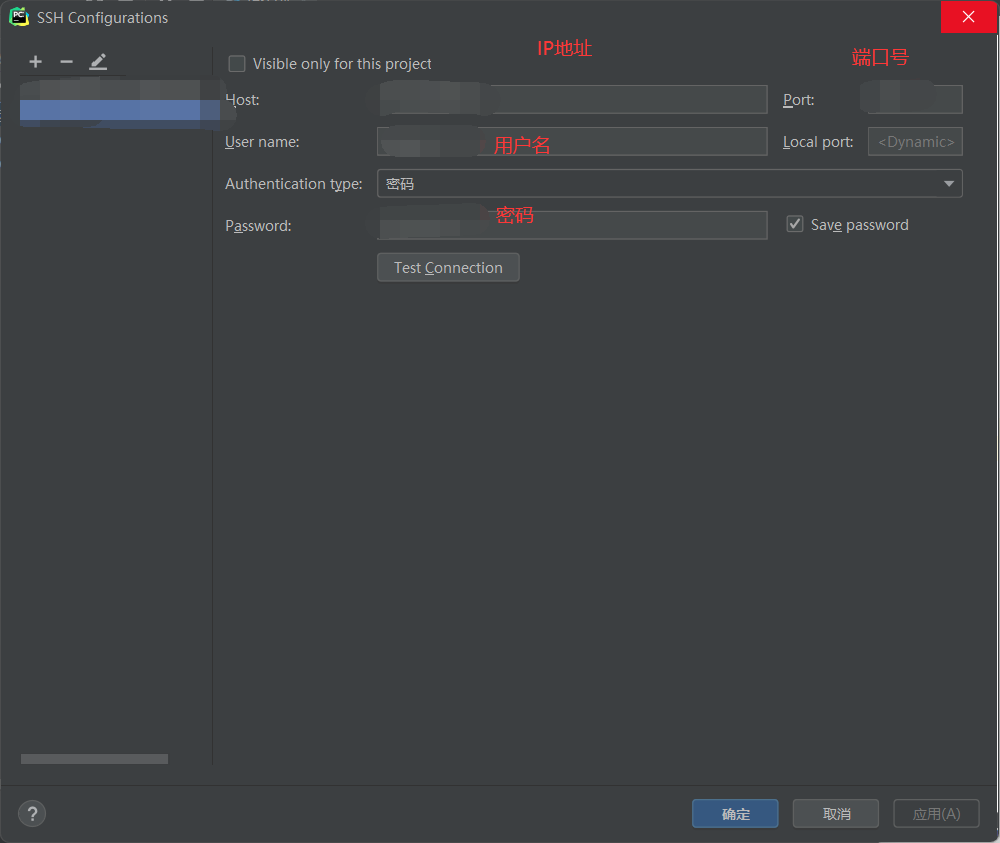
点击确定后返回上一个界面,可以点击Test_connection尝试连接,successful connect说明可以正常连接服务器了。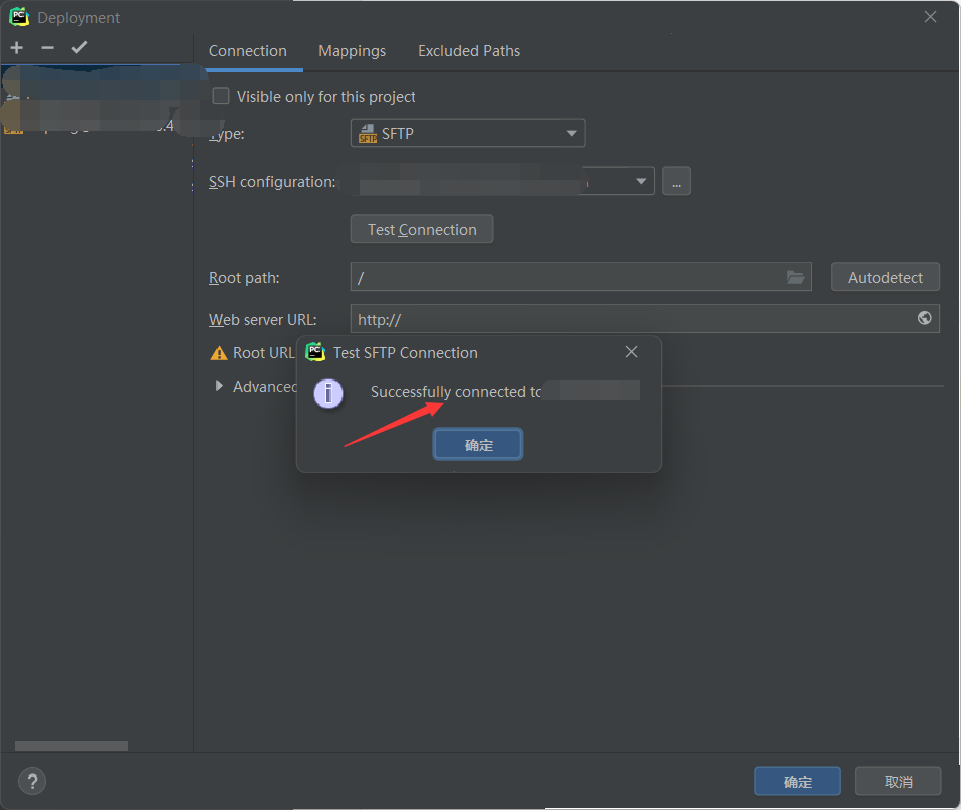
关键一步来了!-——配置文件映射信息。点击mappings,local path即为本地文件夹的路径,用的是\斜杠,deployment path是远程服务器对应的路径,重点!,服务器最后的文件夹名称一定要和本地的文件夹名称一样,我这里本地是lzy,服务器也要创建一个lzy同名文件夹,否则后面运行文件时,会报找不到文件的错误!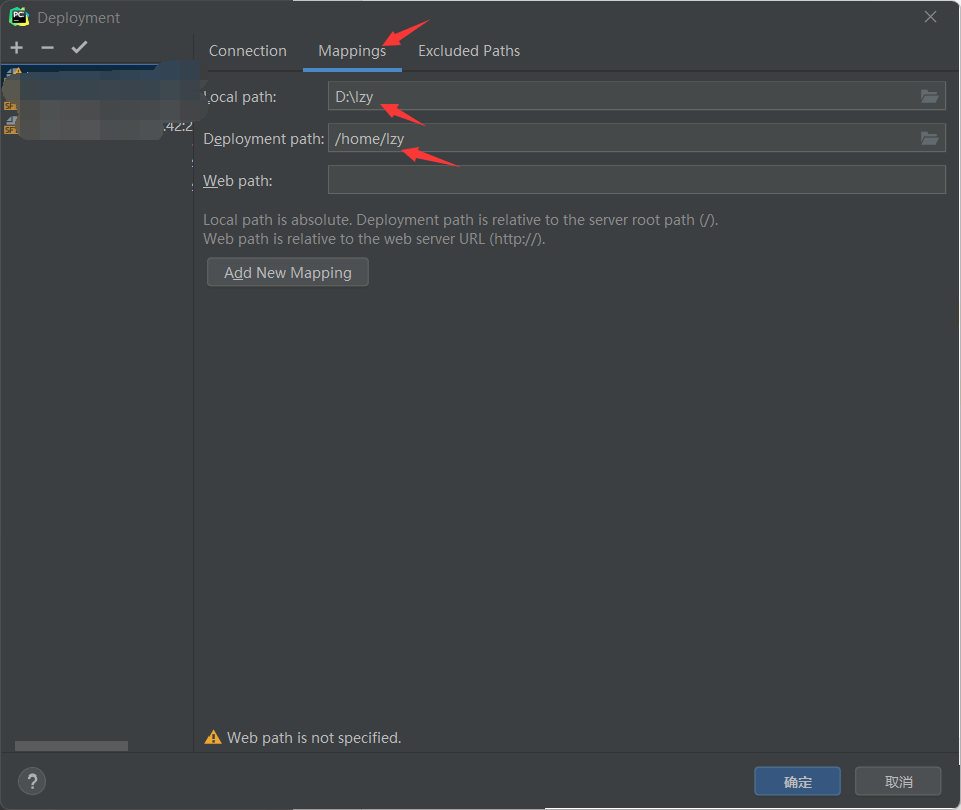
然后创建虚拟环境,选择ssh创建,选择我们之前创建好的服务器连接: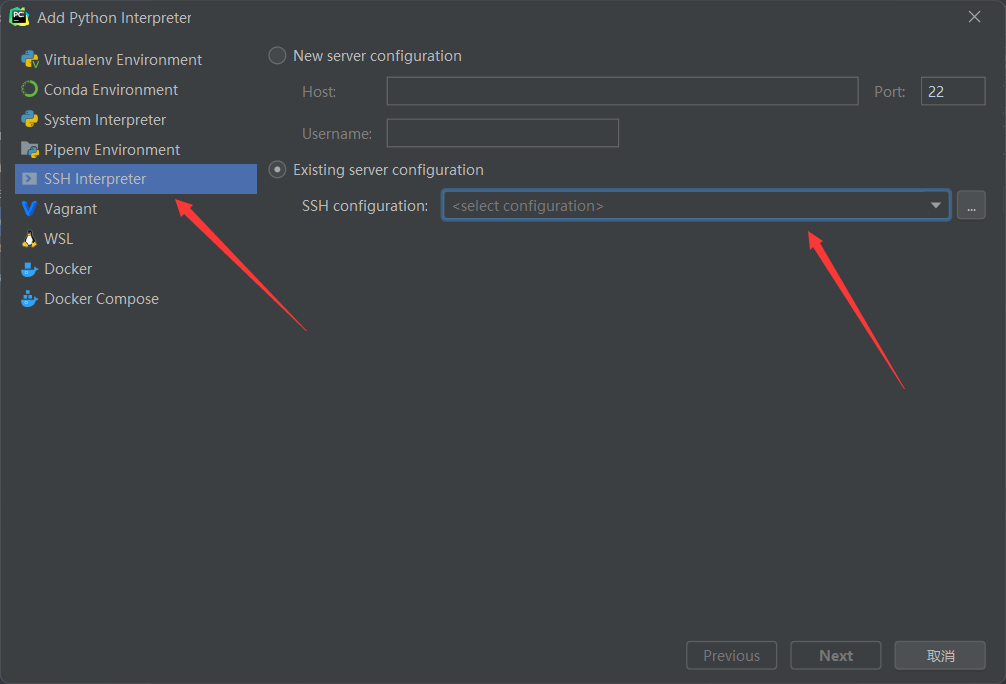
选择远程服务器中conda的虚拟环境,然后把之前的文件的映射关系填到这上面来。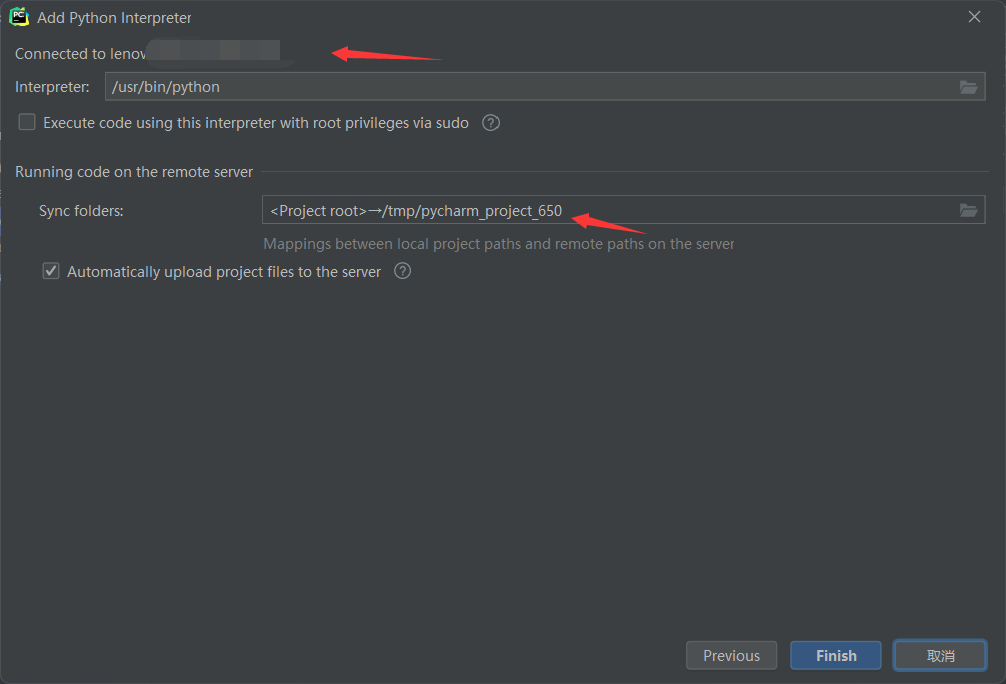
点击finish,点击右侧的齿轮然后showall,找到远程服务器的环境,点击右侧的编辑。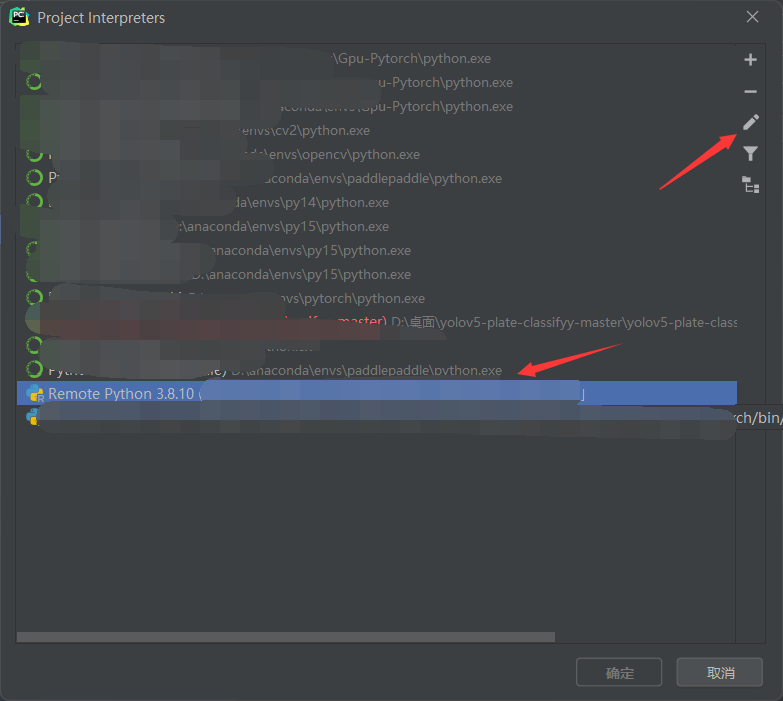
改为SSH连接,修改SSH configuration和解释器路径,修改成自己的就可以。然后点击OK。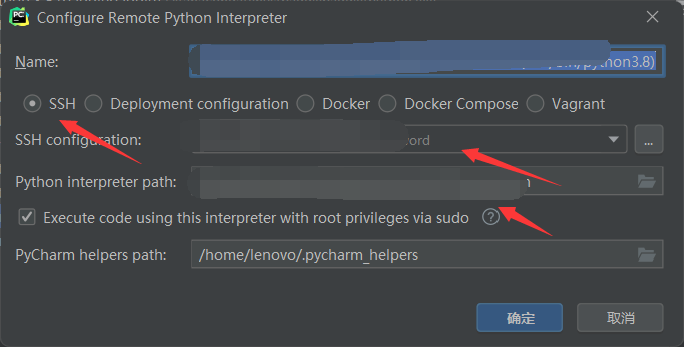
可以看到远程服务器上的虚拟环境中的库。我已经提前安装了Pytorch和torchvision和torchaudio,并且是GPU版本的。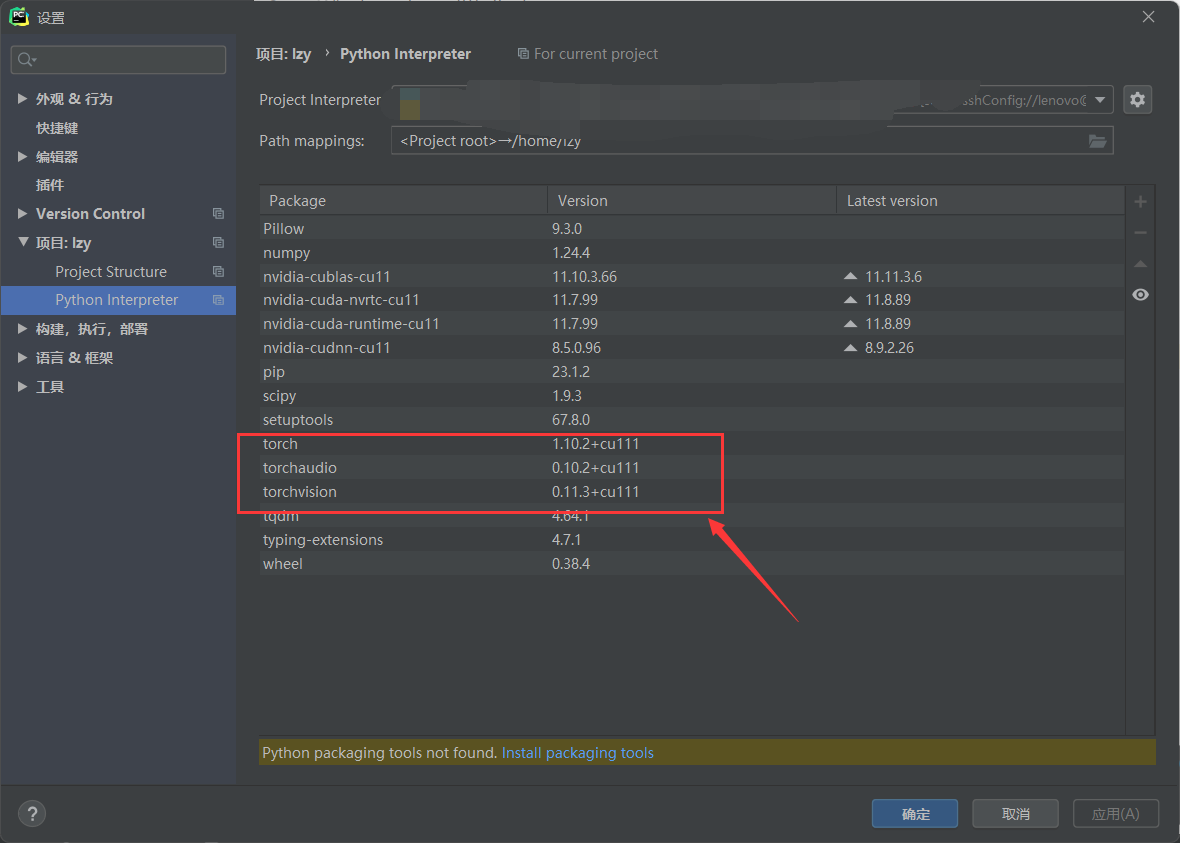
将文件自动上传打开,也可以手动上传文件,在上传时,点击整个目录夹,然后上传。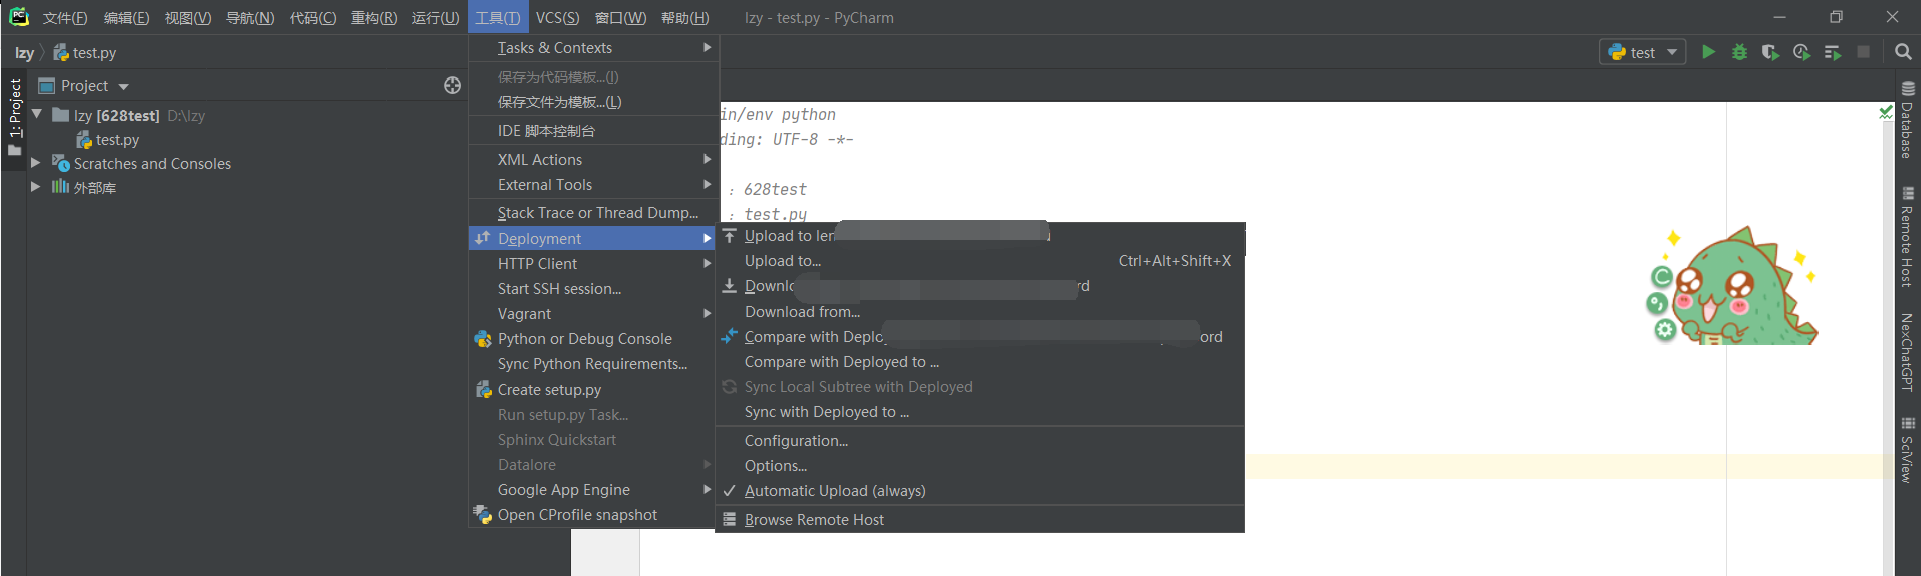
写个脚本测试一下,服务器上的Gpu有没有成功连接:
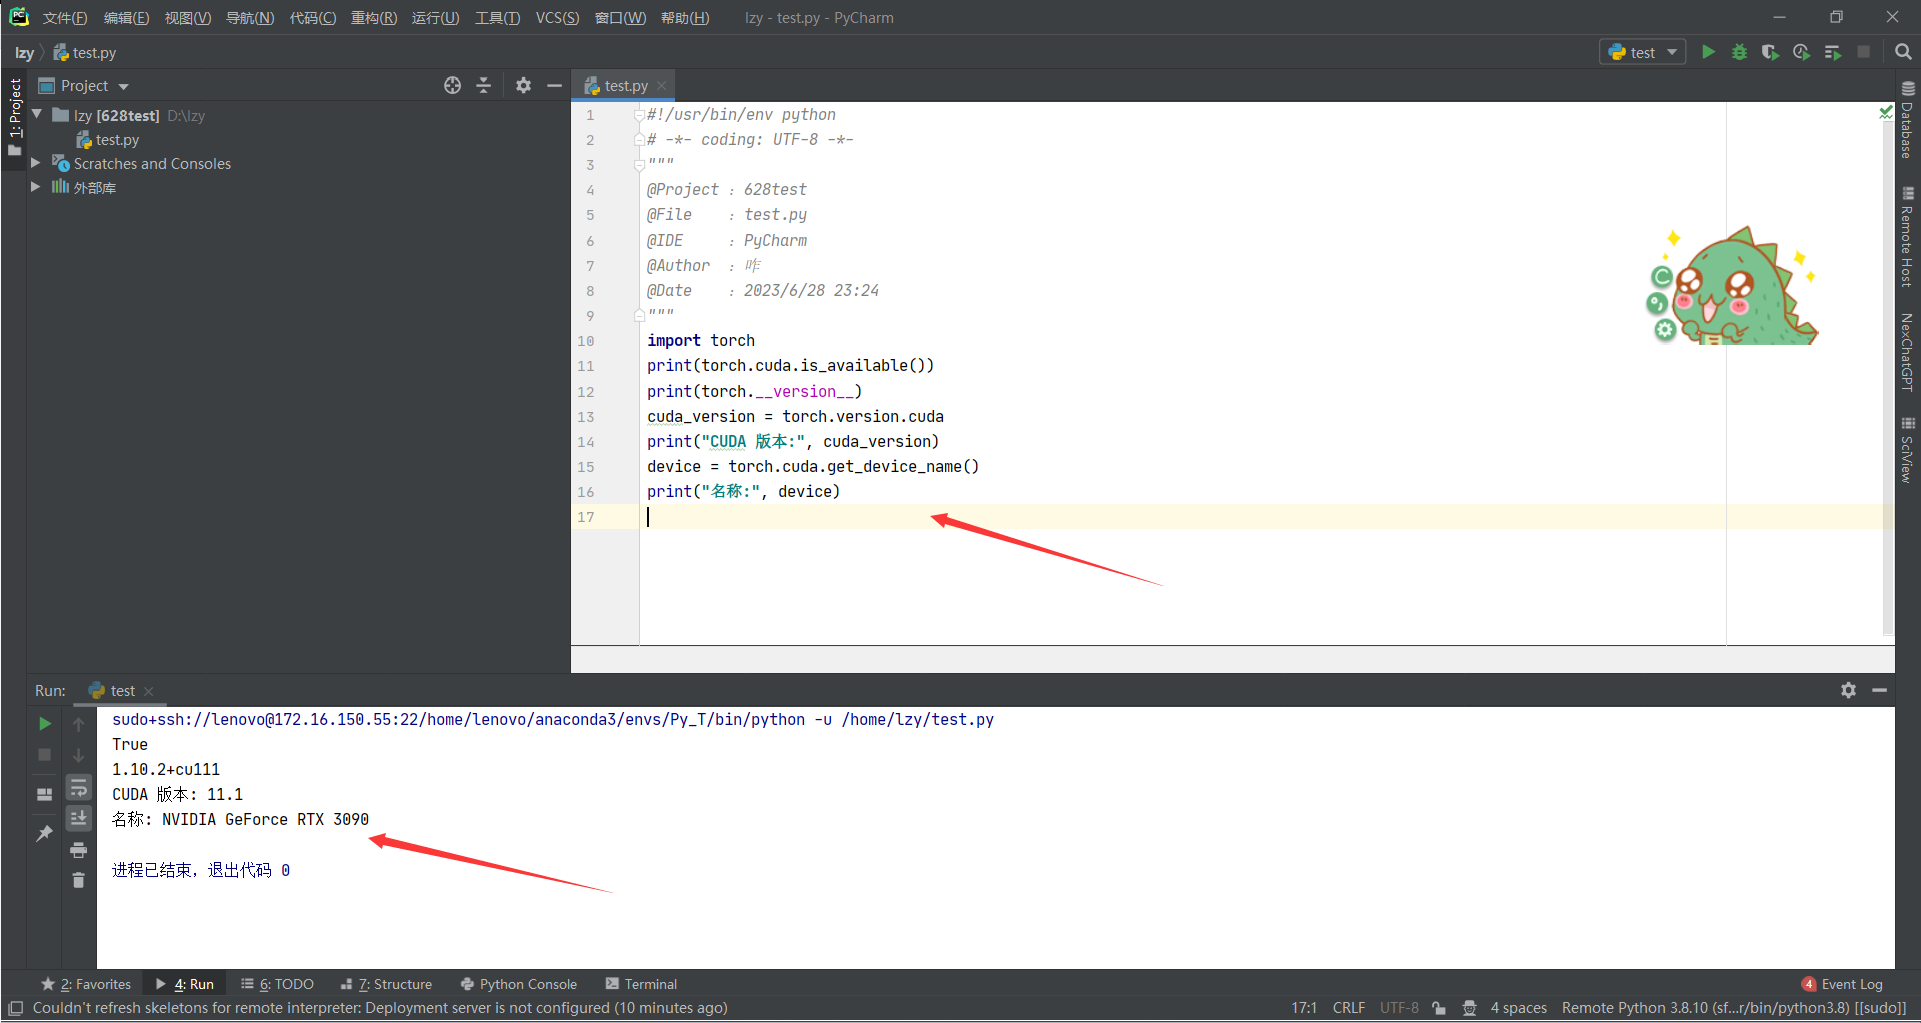
输出:
现在代码就是在远程服务器上跑的了,用的是服务器上的GPU,至此Pycharm连接远程服务器就结束了,开始愉快的使用服务器上的显卡吧!下面给大家推荐两个很实用的工具,xshell和xftp。
二、xshell7和xrtp7配合使用
xshell是用连接远程服务器的,xrtp是用来传输文件的。xshell连接之后就相当于linux的命令窗口,可以使用各种linux的指令来控制远程服务器的动作。xrtp是在xshell连接上之后,和远程服务器进行文件互传的工作,它有可视化界面,非常方便。xshell和xrtp免费版下载地址:xshell和xrtp免费版下载地址。
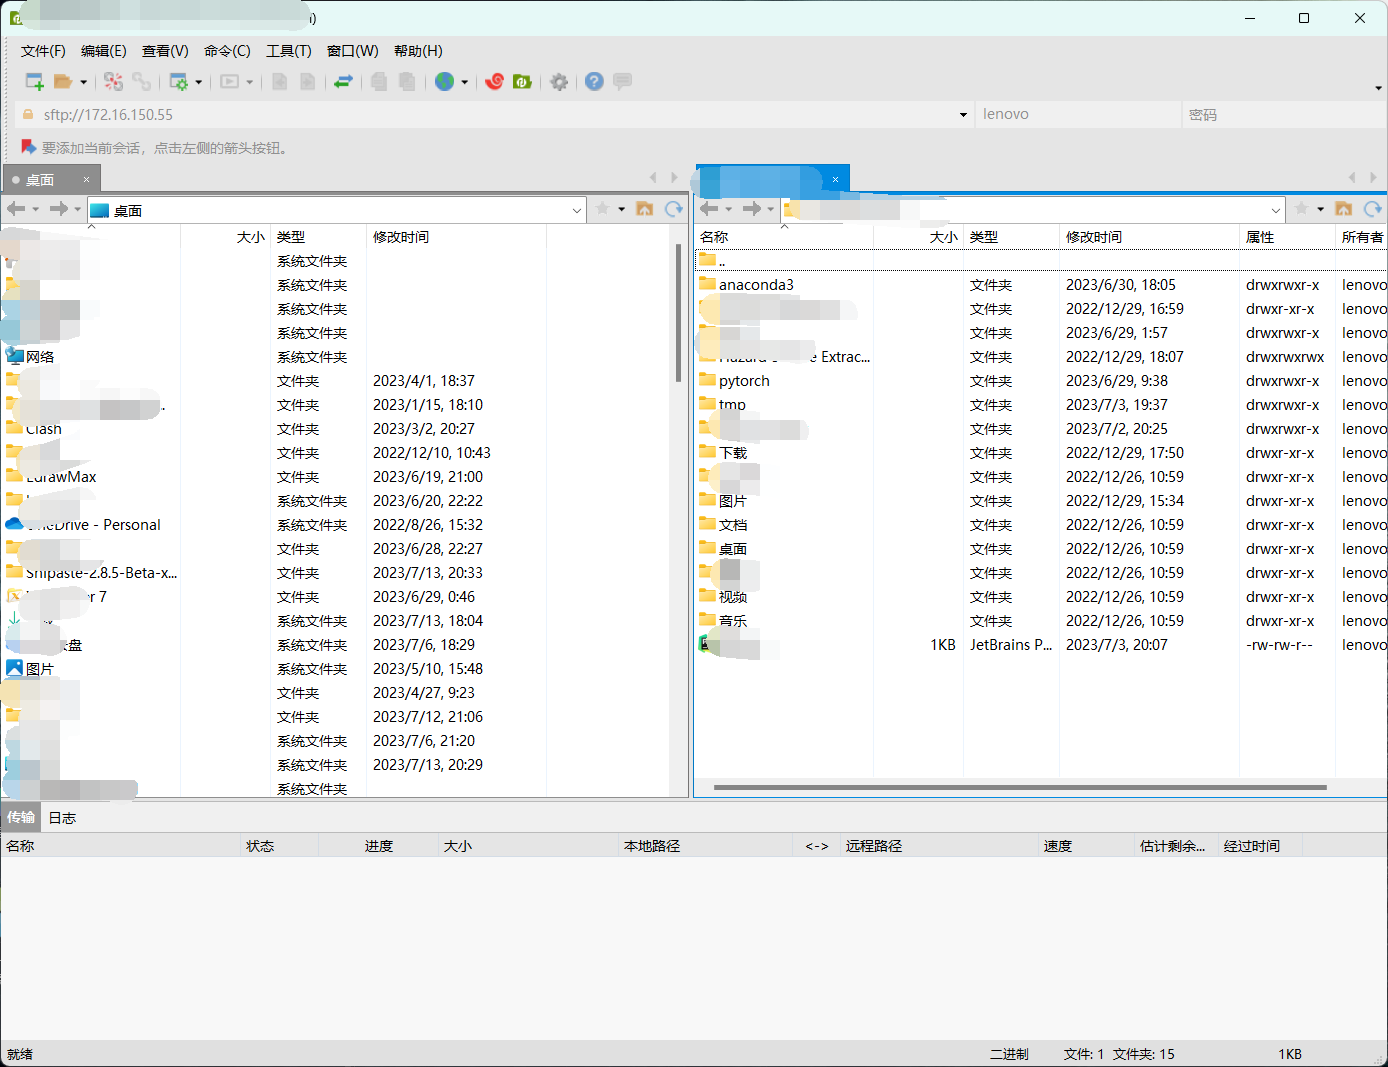
填ip和端口号,用户名和密码就可以直接连接了,下一次可以不用输密码直接连接了。主要网络问题,如果挂着代理,要把代理关掉,确保当前网络是适合连接当前服务器的。
三、总结
之前觉得配置远程服务器和本地的Pycharm连接非常麻烦,随着这篇博客的完成,感觉也不是很麻烦了。思路很清晰,之前踩的坑都帮大家一一说明了,如果大家还遇到了其他问题也欢迎在下方评论!
1 | #!/usr/bin/env python |
1 | True |
将device设置成GPU
- device = torch.device(“cuda” if torch.cuda.is_available() else “cpu”) # 三目判断
- model = model.to(device)
- loss_F = loss_F.to(device)
- train_img = train_img.to(device)
- train_label = train_label.to(device)
1
2
3
4
5
6
7
8
9
10
11
12
13
14
15
16
17
18
19
20
21
22
23
24
25
26
27
28
29
30
31
32
33
34
35
36
37
38
39
40
41
42
43
44
45
46
47
48
49
50
51
52
53
54
55
56
57
58
59
60
61
62
63
64
65
66
67
68
69
70
71
72
73
74
75
76
77
78
79
80
81
82
83
84
85
86
87
88
89#!/usr/bin/env python
# -*- coding: UTF-8 -*-
"""
@Project :Pytorch_learn
@File :train_GPU.py
@IDE :PyCharm
@Author :咋
@Date :2023/7/13 22:12
"""
import torch
import torchvision
from torch.utils import data
from Mymodel import MyModule
from tensorboardX import SummaryWriter
# 0.设置参数
batch_size = 64
lr = 0.01
epochs = 20
savetime = 5
device = torch.device("cuda" if torch.cuda.is_available() else "cpu")
# 1.准备数据集
train_data = torchvision.datasets.CIFAR10("CIFAR10",train=True,transform=torchvision.transforms.ToTensor(),
download=True)
test_data = torchvision.datasets.CIFAR10("CIFAR10",train=False,transform=torchvision.transforms.ToTensor(),
download=True)
# 2.加载数据集
train_loader = data.DataLoader(dataset=train_data,batch_size=batch_size)
test_loader = data.DataLoader(dataset=test_data,batch_size=batch_size)
train_len = len(train_loader)
test_len = len(test_loader)
print("训练集长度为:{}".format(train_len))
print("测试集长度为:{}".format(test_len))
# 3.定义网络结构,实例化模型
model = MyModule()
model = model.to(device)
# 4.定义损失函数
loss_F = torch.nn.CrossEntropyLoss()
loss_F = loss_F.to(device)
# 5.定义参数更新方式
optim = torch.optim.SGD(model.parameters(),lr=lr)
# 6.开始训练和评估
model.train()
write = SummaryWriter("log_6")
for epoch in range(epochs):
print("-------开始第{}轮训练,总共{}轮-------".format(epoch,epochs))
train_loss = 0
for train_time,train_item in enumerate(train_loader):
train_img,train_label = train_item
train_img = train_img.to(device)
train_label = train_label.to(device)
# 前向传播
result = model(train_img)
# 计算损失
loss = loss_F(result,train_label)
# 反向传播更新参数
optim.zero_grad()
loss.backward()
optim.step()
train_loss += loss
model.eval()
test_loss = 0
right =0
with torch.no_grad():
for test_time,test_item in enumerate(test_loader):
test_img,test_label = test_item
test_img = test_img.to(device)
test_label = test_label.to(device)
test_result = model(test_img)
# 获取测试集上的loss
loss = loss_F(test_result,test_label)
test_loss += loss
# 获取测试集上的准确率
right += (test_result.argmax(1) == test_label).sum()
accuracy = right/test_len
write.add_scalar("train_loss",train_loss,epoch)
write.add_scalar("test_loss",test_loss,epoch)
write.add_scalar("accuracy",accuracy,epoch)
print("训练集上的损失为:{}".format(train_loss))
print("测试集上的损失为:{}".format(test_loss))
print("测试集上的准确率为:{}".format(accuracy))
if epoch % savetime ==0:
torch.save(model,"./model/model{}.pth".format(epoch))
print("训练完成!")